
You climb into your Lafayette Park attic and find moisture. Maybe frost on the nail heads. Maybe a dark stain spreading across a rafter. Your stomach drops. Is the roof failing, or is this something else entirely?
Getting this diagnosis wrong is expensive. A homeowner who assumes condensation when they actually have a roof leak will watch that stain grow into rotted decking and mold colonies. A homeowner who panics and replaces shingles when the real problem is a vapor barrier issue just paid for the wrong fix.
This guide gives you a clear, step-by-step way to read your attic and understand what you are dealing with. And it is written specifically for Detroit homes, because the physics here are different from Phoenix or Atlanta.
Why Lafayette Park Homes Face This Problem More Than Most
Lafayette Park is a concentrated neighborhood of mid-century modern architecture built primarily on flat and low-slope rooflines. These designs are beautiful, but they create unique attic conditions. Shallow roof pitches reduce natural air movement through attic cavities. Some units have limited soffit vent surface area relative to the volume of the space above the living area.
Combine that with Detroit’s climate and you get a perfect setup for moisture confusion. During a polar vortex event, outdoor temperatures can drop 40 degrees Fahrenheit in 24 hours. Indoor humidity generated by cooking, showers, and even breathing has to go somewhere. If your attic air sealing and ventilation are not dialed in, that moisture migrates upward and condenses on the coldest surfaces it finds, which are usually your roof sheathing and nail heads.
Meanwhile, Wayne County’s freeze-thaw cycles between December and March can also produce ice dams along eave lines. Ice dams are a third category entirely, sitting somewhere between condensation and a structural leak. They can cause real water intrusion even on roofs with perfectly intact shingles.
The Science Behind Attic Condensation (Dew Point Explained Simply)
Warm air holds more moisture than cold air. This is not a metaphor. It is physics. When warm, humid air from your living space finds a cold surface in your attic, it releases that moisture the moment the surface temperature drops below the dew point.
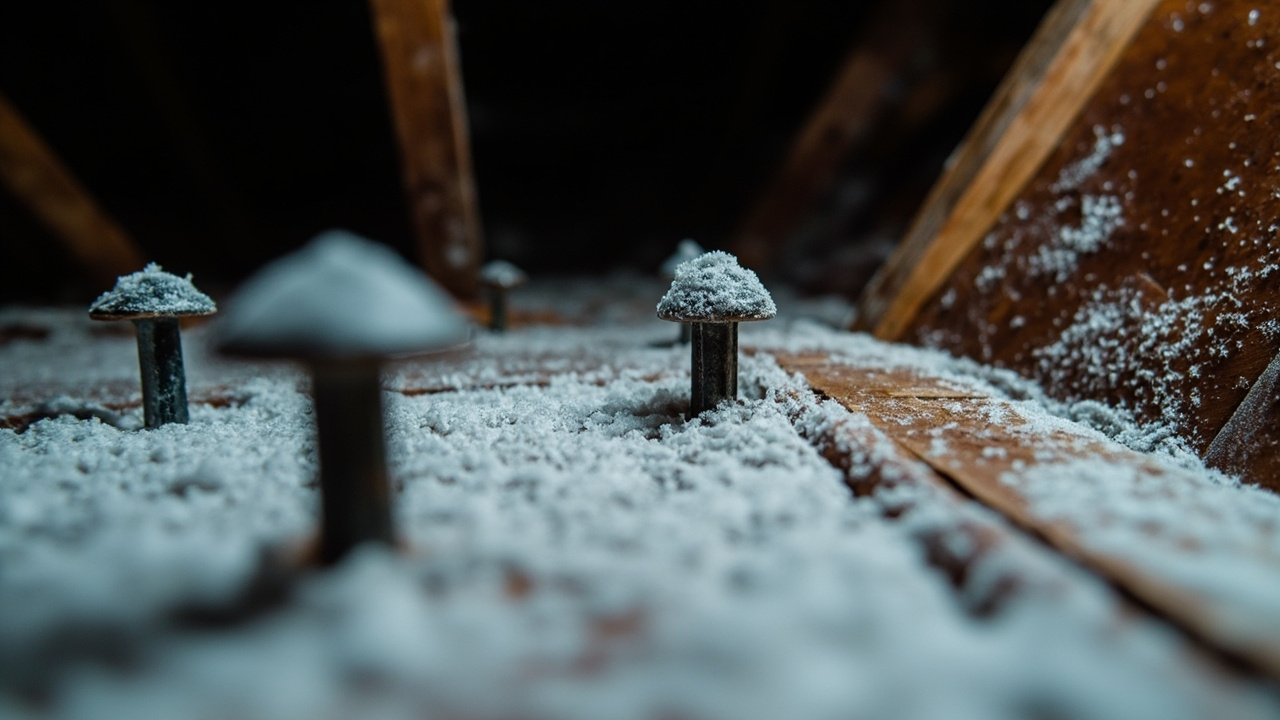
In a Detroit winter, your attic sheathing can sit at 15 to 25 degrees Fahrenheit. Your indoor air at 68 degrees with 40 percent relative humidity has a dew point around 40 degrees. That air hits the sheathing and deposits moisture immediately. Over days and weeks, that moisture accumulates into visible frost, dripping water when temperatures rise, and eventually mold growth on hygroscopic materials like wood fiber and fiberglass insulation.
The key word here is widespread. Condensation spreads. It does not target one spot. If you see general dampness or frost across large portions of your roof sheathing, that pattern is telling you something about your attic environment, not about your shingles.
Signs That Point Toward Attic Condensation
These are the diagnostic markers of a condensation problem. Take notes when you go up there.
- Frost on nail heads (called “shiners”) that appears in cold weather and disappears when temperatures rise above freezing
- Widespread dampness or discoloration across the underside of roof sheathing, not concentrated in one area
- Insulation that feels damp or compressed, especially near exterior walls where the attic floor meets the eave
- Musty or mildew smell that is stronger when you enter the attic after a cold spell
- Blocked or absent soffit vents, or baffles that have collapsed and are preventing air flow from the eaves
- A vapor barrier that is missing, damaged, or installed incorrectly on the attic floor
- Moisture that appears consistently during cold weather but not specifically tied to rain events
The ventilation math matters here. Michigan building codes and energy guidelines recommend a minimum net free ventilation area of 1 square foot for every 150 square feet of attic floor space when no vapor barrier is present. Many older Lafayette Park units and Detroit neighborhoods like Indian Village or Woodbridge fall short of this, especially if soffit vents were painted over during renovations.
Signs That Point Toward a Roof Leak
A true roof leak behaves differently. It is localized. It follows a path. And critically, it correlates with weather events, not just cold temperatures.
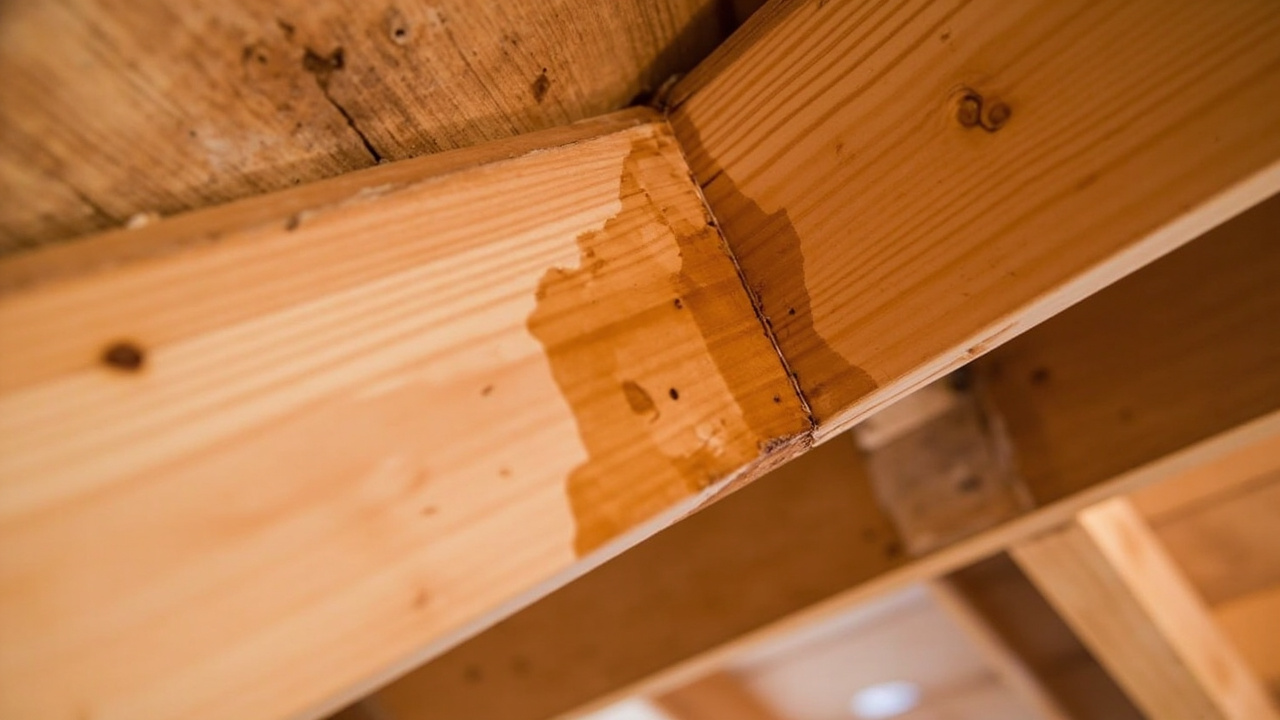
Look for water staining on rafters or sheathing that traces a defined line downward from a single entry point. This is called tracking, and it tells you water is running from one spot. The entry point is almost always damaged flashing around a chimney, skylight, or plumbing vent, a section of compromised shingle underlayment, missing or lifted shingles, or a failed valley seam.
Key indicators of an actual roof leak include staining that appears or worsens specifically after a rain event, water dripping or running from one concentrated area, visible daylight through the roof deck when you look up from inside, rot concentrated at a single rafter bay or around a penetration, and brown staining that has dried and re-wetted multiple times, leaving layered rings.
Roof flashing failures are the most common source of localized leaks in Detroit. Metal expands and contracts through Michigan’s freeze-thaw cycles, and counter-flashing at chimney bases can separate over time. If you see staining directly below a chimney, a plumbing stack, or a valley, start your investigation there.
Quick Comparison Table for Attic Moisture Diagnosis
| Factor | Condensation | Roof Leak |
|---|---|---|
| Timing | Cold snaps, winter months | After rainfall or snow melt |
| Location | Widespread across sheathing | Localized to one area or rafter bay |
| Appearance | Frost, uniform dampness, mold bloom | Drip tracks, brown staining, wet insulation below entry point |
| Nail heads | Rust on shiners throughout attic | Clean nails except near damage zone |
| Weather correlation | Matches cold temperatures | Matches rain or ice dam events |
| Common cause | Poor ventilation, missing vapor barrier, air leaks | Failed flashing, damaged shingles, compromised underlayment |
| Fix category | Ventilation improvement, insulation upgrade | Roofing repair, structural drying |
The Detroit Factor: Ice Dams and Why They Complicate Everything
Ice dams deserve their own section because they blur the line between condensation and a structural leak. An ice dam forms when heat escaping through your attic floor warms the upper roof sections and melts snow. That water runs down toward the cold eave overhang, refreezes, and builds a wall of ice. Water backs up behind that dam and eventually finds its way under shingles.
Here is the cruel irony. Ice dams are most common in homes with poor attic insulation, which also tends to mean poor moisture management. You can have active condensation throughout the attic and an ice dam leak at the eave simultaneously. The two problems share the same root cause: heat and moisture escaping your living space into the attic.
Michigan’s freeze-thaw cycles make this worse. Detroit does not get one cold spell and then spring. It cycles repeatedly between freezing and thawing between December and March. Each cycle gives water another opportunity to back up, refreeze, and push deeper under the shingle underlayment.
The U.S. Department of Energy recommends an R-value of R-49 to R-60 for attic insulation in Michigan’s climate zone. Most older Detroit homes, including many mid-century units in Lafayette Park, fall significantly below this. Upgrading insulation is often the single most effective step to reduce both condensation and ice dam risk at the same time.
If you are unsure whether your water intrusion is ice dam related, look at where the staining appears. Ice dam leaks almost always show up at exterior walls or the first few feet of ceiling near an exterior wall. Condensation is more diffuse. A true flashing or shingle failure is higher up the roof plane.
The DIY Flashlight Inspection Test
You can gather meaningful diagnostic information with a basic attic inspection. Do this safely. Wear a respirator rated for mold, bring a bright flashlight, and step only on joists or a crawl board, never on insulation.
Here is what to do and note during the inspection.
- Enter the attic on a calm day, 24 to 48 hours after a significant rain event or cold snap. Timing matters for accurate readings.
- Check the nail heads on the underside of the sheathing. Rust concentrated across many nails in many locations points to condensation. Rust or wetness isolated to one zone points to a leak.
- Look at the sheathing surface color. Black or dark green staining that is widespread suggests mold from chronic condensation. Brown water marks that trail down from a specific point suggest tracking from a penetration failure.
- Find all roof penetrations from inside. Plumbing vents, exhaust fans, chimneys, and skylights are the most common leak entry points. Shine your flashlight around the base of each one and look for staining or wet wood.
- Inspect your soffit areas. Push back insulation at the eave line and look for baffles. If there are none, or if they are crushed flat, air cannot move from the soffits to the ridge. This is a primary condensation driver.
- Check whether your attic exhaust fans or bathroom fans vent to the exterior. Many older Detroit homes vent these into the attic space, which dumps warm humid air directly where you do not want it.
- Feel the insulation surface. Wet or clumped insulation directly below sheathing staining confirms moisture is wicking down. Note the exact location relative to your roof layout above.
Document what you find with photos. Note whether the moisture is near penetrations or widespread. This information is valuable whether you are calling a roofer, a restoration company, or your insurance adjuster.
What the Repair Cost Difference Looks Like
Understanding the cost gap between these two problems helps you make an informed decision about urgency and who to call.
| Problem Type | Likely Trades Involved | Relative Cost Range | Insurance Coverage |
|---|---|---|---|
| Attic condensation (ventilation fix only) | Insulation contractor, HVAC for exhaust rerouting | Lower end | Rarely covered, considered maintenance |
| Attic condensation with mold remediation | Restoration company, insulation contractor | Mid range | Sometimes covered depending on policy language |
| Localized roof leak, flashing repair only | Roofing contractor | Lower to mid range | Often covered if sudden and accidental |
| Roof leak with structural drying and mold | Restoration company, roofer, possibly structural contractor | Higher range | Often covered if reported promptly |
| Ice dam damage with interior water damage | Restoration company, roofer | Mid to higher range | Coverage varies widely by policy |
Insurance coverage is a real factor here. If you have a roof leak that caused interior damage, prompt documentation and professional drying records matter enormously for your claim. You can learn more about navigating that process in this guide to getting your Detroit home insurance to actually pay for water restoration.

When Mold Enters the Picture
Both condensation and roof leaks can lead to mold growth in your attic. Mold needs two things: moisture and an organic food source. Your wood sheathing and framing provide the food. Either problem provides the moisture. In Detroit’s climate, attic mold is one of the most common findings during home inspections, and it is one of the most misunderstood.
Many homeowners try to address attic mold with bleach sprays. This does not work on porous wood surfaces. The bleach oxidizes the surface stain but does not penetrate deep enough to kill the fungal root structure (hyphae) embedded in the wood grain. For a detailed explanation of why bleach fails and when professional remediation is needed, read this article about why bleach won’t fix your mold problem and when to call a pro.
IICRC S500 Standards govern professional water damage response, and IICRC S520 governs mold remediation. A certified restoration company follows these protocols when assessing attic moisture and mold, using moisture meters and thermal imaging to map the actual extent of damage before any work begins. This is not a job for guesswork.
Mold in an attic can spread to wall cavities below if the moisture source is not corrected first. Fixing the mold without fixing the condensation or leak guarantees a return visit.
When You Need a Professional Inspection, Not More DIY
Your flashlight inspection gives you useful information. But there are clear situations where you need a certified professional in your attic before you take another step.
Call a restoration professional when you see visible mold growth covering more than a few square feet. Disturbing large mold colonies without containment spreads spores throughout your living space. Get professional eyes when you cannot determine the moisture source after your inspection, when you see sagging or soft spots in the sheathing indicating structural compromise, or when any water damage has reached finished interior surfaces like ceilings or walls below the attic.
Water that has passed through your attic floor and entered the living space needs a professional drying protocol, not just a bucket and a fan. Insulation and structural wood must reach appropriate moisture content levels before reconstruction begins. Skipping this step leads to hidden mold that surfaces months later.
If your water damage is connected to an insurance claim, having a restoration company document the drying process with moisture logs is often required by the insurer. The insurance claim process for water damage has specific documentation requirements that a restoration company handles as part of the job.
Metro Detroit’s restoration professionals who work regularly in Lafayette Park, Midtown, and the greater Wayne County area understand the specific attic configurations, building vintage, and climate conditions that drive these problems. A generic inspection from someone who does not know these neighborhoods is worth less than one from someone who has been inside dozens of similar attics in your zip code.
If you found moisture in your attic this season and you are not sure what you are looking at, the right move is a professional assessment. The wrong move is waiting to see if it gets better on its own. In a Michigan winter, it will not.